How to Design a Brand Board for your Client
“I’ll know it when I see it.”
Ugh. How many times have you heard that from a client?
What they mean is, “I’m not going to spend a lot of time researching or thinking about what I want. I’d prefer if you just keep designing and revising 100 logos until I see something that blows me away.”
This is the exact wrong way to go about a branding or logo design project.
As you’ve likely experienced if you do design work, these “know it when they see it” projects can have massive scope creep and uncontrollable revisions to the point where you are ready to pay the client to go somewhere else.
You’ll often end up with unhappy clients, and sometimes you’ll never even get there!
Besides just saying “no” to certain projects that have client red flags, the other option is to do some of that research and inspiration yourself, before you even think about starting on a logo design.
That’s where a brand board comes in.
What is a Brand Board
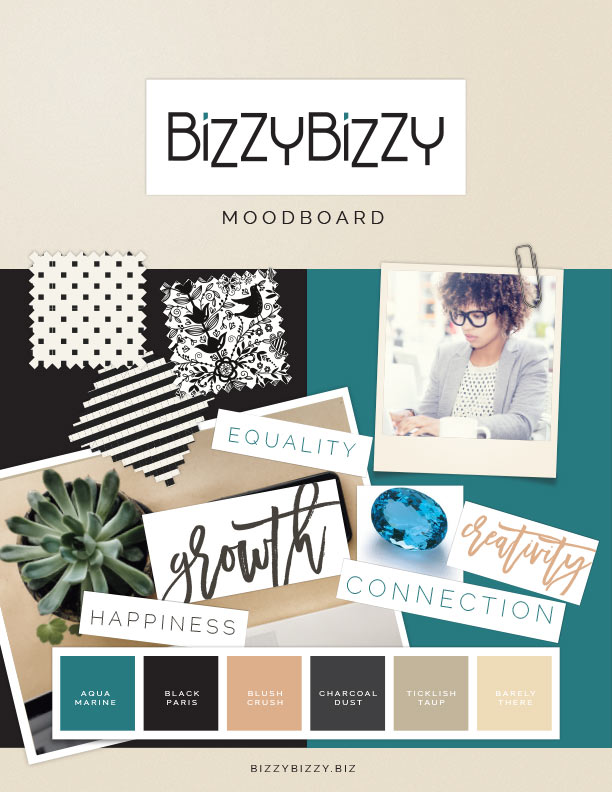
The point of a brand board (also called a mood board) is to gather inspiration, styles, imagery, colors and fonts that will help you and the client agree on some kind of a vision before embarking on actually designing the logo. By going through this process step by step, you’ll get buy-in on various pieces of the overall brand, and it will be easier to get to a final logo design without having to revise until your fingers fall off.
Once you have actually gone through the full branding process, the brand board can be edited with the final choices. Then it can become a part of the larger brand style guidelines.
Brand board designs can be put together anyway that tickles your fancy. It can be one page or multiple. You could make a physical brand board on a posterboard if you’re feeling super crafty with actual fabric swatches, photographs and things cut out from magazines. We typically use a 1-page 8.5×11” digital brand board that we can easily plop into our brand style guidelines later.
Typically a brand board design happens within a branding or logo design process. (Note, we aren’t going to talk about the full logo design or branding process in this article.)
If you already have a logo designed, that’s OK too. Designing a brand board is still a helpful exercise to go through with a new client before working on any large project to make sure you are on the same page about their branding desires. This is especially helpful if they don’t have any kind of brand guidelines.
Brand Board Design Step 1: Color Palette Selection
The first step in creating a brand board is to establish a color palette. Have the client choose colors from a Pantone swatch book when possible. If you can’t choose colors in person, you can use Pantone’s Color Finder on their website or use an online color palette inspiration like Coolors.
Warning: If you’ve ever designed anything before, you know that the digital colors on the screen will almost never exactly match the colors in print. So make sure to warn the client about the problems with color variation.
When looking at the Pantone Color Bridge swatchbook , we recommend avoiding the colors that have a drastic difference between the CMYK version and the Pantone version, especially neon colors and really bright hues. These colors will cause your client a headache with color matching for the rest of their brand’s life.
The primary color(s) of the brand board color palette may be the colors found in the logo itself (usually limited to 2 or 3). But we also recommend choosing additional colors to fill out the entire palette. These colors will be used on everything from the website to business cards. It’s best if you select a variety of lights, darks and neutral colors that can be used as backgrounds to make sure the client–and future designers–have some good options.
Remember, the purpose of a brand board is to help aid the design process, but if the colors or styles you create need to be tweaked later, that’s fine. When the branding process is complete, you’ll be ready to create a brand style guide. At that time you will solidify all colors choices and you can update the brand board and then they should pretty much be set in stone.
In addition to displaying the color palette on the brand board, we also like to include a photograph (could be from nature or an object) that reflects at least one of the primary colors.
Brand Board Design Step 2: Core Values
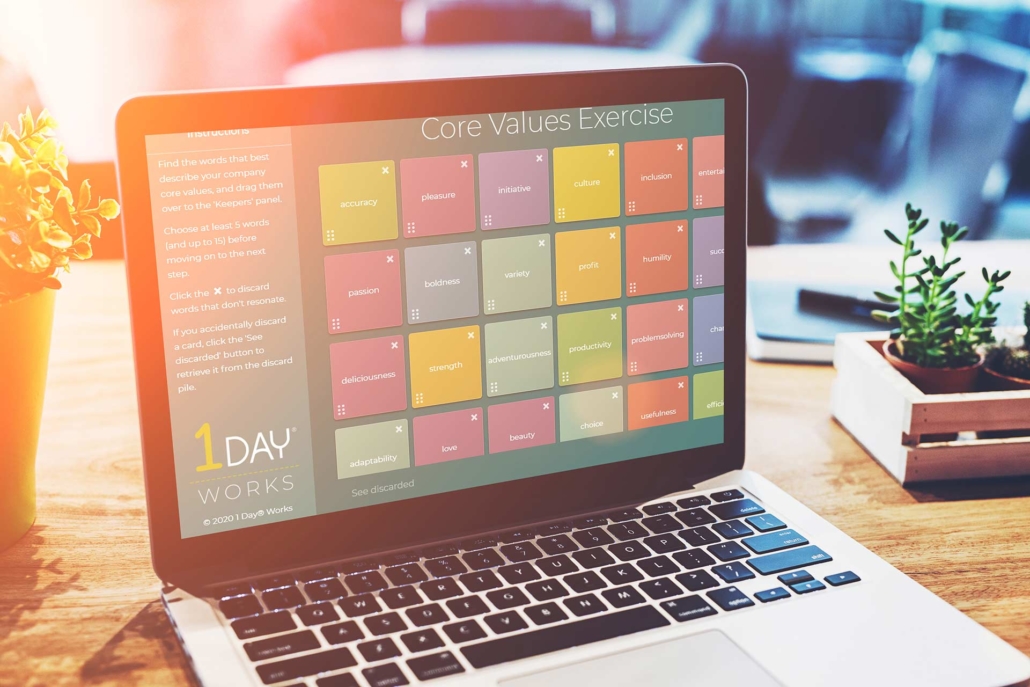
If you’ve looked around our website much, you’ve probably seen reference to our Core Value Cards or our Core Values App. We are a bit obsessed with them, we admit. Core values are so important for a brand, and we created these tools to make determining a businesses’ core values a fun experience with sorting and interactivity.
Have the client go through the Core Values exercise and pick 5 that are the most important. We know this is tough to boil down your entire business into a handful of words. But if you let them pick too many, you won’t get a true sense of what is MOST important to them.
Once the values have been selected or at least narrowed down to a short stack, have the client talk them out while they whittle them even further. This is the real meat of the Core Values Exercise. The client will reveal things about themselves or their business that you wouldn’t have known to ask in a questionnaire.
Pay close attention to the other words they use when describing why each core value is important to them, and write those words down too. All of this is great fodder for copy writing for a website.
The main core values should be included on the brand board to remind the designer and the business owner what the business stands for.
Brand Board Design Step 3: Textures
Choosing brand textures or patterned background graphics for the brand board is one of the tougher things to do, but it is extremely helpful when it comes to establishing an overall brand identity. If you have time to design textures from scratch, this is the best option for a truly unique brand.
However, there are lots of great places you can buy textures, including most stock photo websites. The websites we frequent the most are Creative Market and Vector State.
You don’t have to use seamless tileable patterns, but when it comes to the website design, that is always the best option. We prefer creating vector textures in Illustrator rather than Photoshop so you can edit and scale to your heart’s desire.
Brand Board Design Step 4: Imagery
It’s a good idea to include a few photographs on the brand board. These may not actually be used anywhere besides the brand board, but they are still helpful for inspiration and consistency.
We like to include one photo that represents the “persona” or target audience. This might be used as the hero shot on the website, or it might not actually be seen ever again. But it’s always important not only to keep in mind the client’s goals and aesthetic tastes, but also the goals and tastes of THEIR client.
Other imagery may include color inspiration, other logos the client likes, photos of the client themselves, interior design inspiration, or anything else you think is appropriate.
Ask the client to describe what their office looks like and what kind of trinkets and decorations they have. You might find out that your client is really into nautical stuff, which could give you ideas for the logo that you wouldn’t have had before. Or maybe you find out that they are really clean and simple, so you know that any future designs might trend that way.
Brand Board Design Step 5: Typography
Describing what type of fonts a client likes can be difficult. They don’t know the terminology or how to mentally group similar font families. That’s why we’ve developed our Font Finder Cards. It’s so much easier to show a client a ton of options to see what they like (remember, they’ll know it when they see it!)
If you don’t have a deck of cards to sort through, have them look through Google’s Fonts or a website like Font Squirrel. It’s best if this is done with your help in real time so you can discuss what they like and don’t like about each type of font.
You don’t need them to necessarily pick out an exact font that will be used in their logo, but rather narrow down a style.
Then the brandboard can include your top choices for them based on their input. Again, this may change after the branding process is complete. For now, you’re just trying to narrow in on a style.
Brand Board Design Step 6: Logo Inspiration
The final section that we like to add at the top of a brand board is a space for several inspiration logos. This is something you definitely want to do with your client. Once you think you know what kind of logo style they want (i.e. contemporary and clean, character-based, high-tech, etc.) you can find a bunch of examples and talk through each one of them.
This step is where you can really find out if you are understanding what they had in their mind. This is also the step that can prevent you from having to design 100 options for them.
Again, the problem is that clients don’t always have the language to describe what they like. So they need visual examples. Then it’s easier for them to hone in on it.
Once you have talked through a bunch of examples, find 3-5 that are the closest match. Make them grayscale so they don’t clash with the other colors and add them to the top of the brand board.
Brand Board Design Step 7: Client Feedback
Once you have compiled some ideas for the brand board, design them in a visually pleasing way and send it to the client for their feedback. Like all things design — it doesn’t really matter how much you love it if your client isn’t feeling it.
You may need to explain what a brand board is, your thought process in designing it and how any or all of the elements may play into their future branding.
Once you have talked through it with the client and made any revisions, at that point, you have a much better idea of where the logo design should go. You’re no longer choosing from every font on the planet or every color in the spectrum. You shouldn’t have to design 100 logos to get to them to the final version.
And you can reference the brand board during the revision process to remind them of what they chose and why to keep them from straying too far.
Once the client’s logo design is complete, delete the inspiration logos and add their final logo to the top. Replace any fonts or colors that may have shifted during the process with the final ones chosen. Include the brand board in any future style guide or branding standards you create.
If you have any tips on designing a brand board for a client, let us know! We’d love to know what other things you like to include on your brand boards.


Leave a Reply
Want to join the discussion?Feel free to contribute!